Seeing Double: Exploring the Art of Double Exposures
For most people in the days of film photography, a double exposure photograph was something that happened entirely by accident.
If the camera was fully manually controlled, it could happen when a photographer forgot to advance the film to the next blank spot and took a second photograph over an already exposed section of film. Instead of getting two separate photographs, both images would appear in the same frame. Generally, the first image would be a little more prominent while the second image would appear almost like a ghost layered over the first.
Most consumer film cameras in the era when I grew up were designed to prevent this from happening. The shutter button would often remain depressed until the photographer used the film advance mechanism. Advancing the film not only moved the next frame into position, it also reset the shutter button and prepared the camera for the next photograph.
For photographers who deliberately wanted to create double exposures, this meant having a fully manual camera or a more advanced camera that allowed the shutter to be reset without advancing the film.
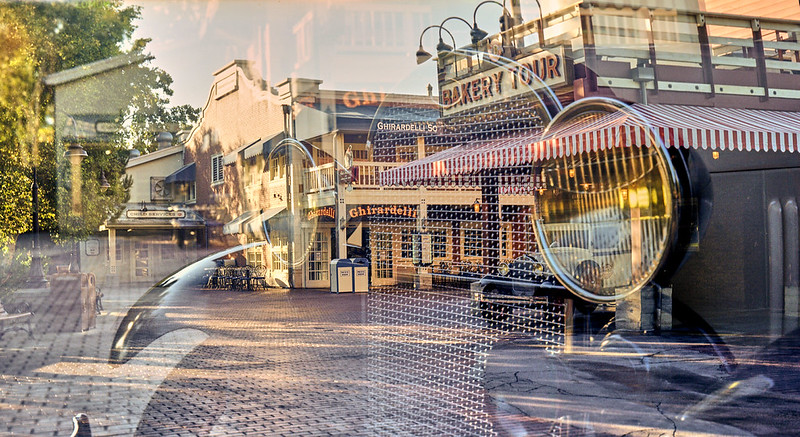
That brings me to the photograph accompanying this article.
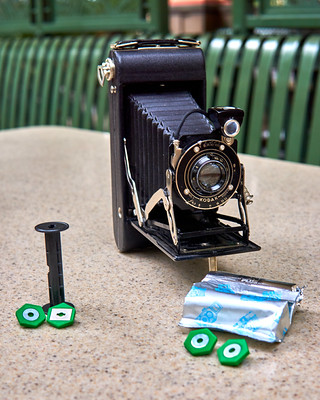
I was given a vintage Kodak Junior Six 16 Series II camera that had belonged to my great grandmother. The camera was made toward the end of the 1930s, and my grandfather had held onto his mother's camera for decades. When it was given to me, the assumption was that it would make a fun display piece sitting on a shelf.
Naturally, I had other ideas.
I was far more curious to see how the digital photography skills I had developed over the years would translate back to a completely mechanical film camera.
The trials and tribulations of learning to use that camera are a story in itself. I will save that story for another time. Suffice it to say that after going through a couple of test rolls, I wanted to take advantage of the camera's completely manual controls and experiment with something I had never even tried digitally at that point.
Double exposures.
I did a little research before heading out and learned that one of the keys to creating a successful double exposure was to be careful about how much light I allowed into each individual exposure. Since the two images were going to occupy the same piece of film, I didn't want the combined brightness of the two photographs to completely overwhelm the film.
My plan was to underexpose each photograph somewhat so that when the two images were combined, I would hopefully end up with something that still contained detail in both exposures.
I took the camera with me to Disney California Adventure and started looking for scenarios that might work well together.
I eventually settled on the Ghirardelli Chocolate Shop and Boudin Bakery courtyard area for my first exposure. I had photographed that area before as a traditional single exposure photograph, so I already knew the scene and how I wanted to compose it.
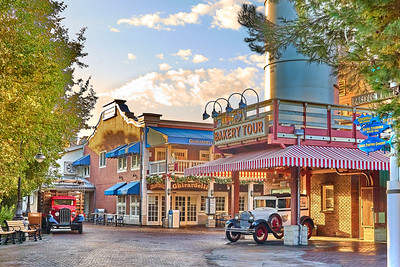
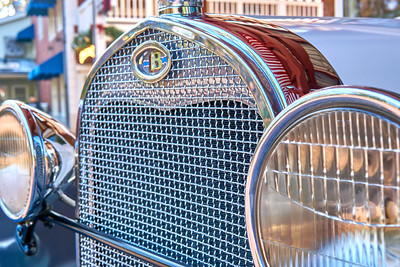
For the second exposure, I moved much closer to the front grill of the vintage Boudin Bakery truck. I had also previously photographed that as a single exposure separately. I felt the texture of the grill might make an interesting blend with the courtyard photograph.
I took the wider courtyard photograph first. Then I repositioned myself much closer to the truck, changed the focus for the much closer subject and took the second exposure.
Then I finished the rest of the roll.
And waited.
One of the fascinating things about shooting film is that the photograph isn't immediately available for inspection. On my way home from the park, I dropped the roll off at a photo lab and then had to patiently wait about a week before I received an email with a link to download the scans.
When I finally opened the photograph, I was delighted.
It worked.
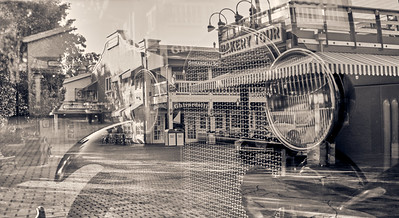
There was something almost magical about seeing the details of both photographs occupying the same frame. My eyes wanted to move back and forth between the two images, discovering the individual details of each photograph while simultaneously seeing how they interacted with one another.
To me, it felt like the photograph had been given a little extra Disney magic, almost as if Tinker Bell had come along and waved her wand over it.
And that was when I realized that double exposure photography isn't necessarily about creating a technically perfect photograph.
It is about creating something that makes people stop and look.
When someone sees a conventional photograph, they generally understand immediately what they are looking at. With a double exposure, there can be a moment of confusion.
"Wait. What am I looking at?"
That moment of curiosity can be incredibly valuable.
Your brain starts trying to separate the layers. You might notice the broad shapes of one photograph first and then suddenly recognize a detail from the second image hiding within it. The photograph becomes something you explore rather than something you simply look at.
There are also some interesting creative decisions you can make when choosing the two images you want to combine.
You can combine a wide environmental photograph with a closeup detail, like I did. You can combine architecture with a person. You can combine a character with the environment around them. You can use textures, patterns, silhouettes, reflections or even completely unrelated subjects.
The trick is to think about how the shapes, colors and brightness levels of the two photographs will interact.
Sometimes you want the two images to blend together almost seamlessly. Other times you want the viewer to clearly see two distinct photographs fighting for attention within the same frame.
Contrast can be particularly useful.
A relatively dark area in one exposure can allow details from the second exposure to show through more clearly, while brighter areas can dominate the combined image. This is one of the reasons deliberately controlling the exposure of your individual images can make such a difference.
You can also experiment with the order in which you capture the exposures. If your camera or process allows you to do so, the first image and second image don't necessarily have to play equal roles in the final photograph.
And if you are working with a digital camera, you don't necessarily need a camera that has a dedicated double exposure mode.
My Sony A6000 actually had a downloadable application that gave the camera a double exposure capability. After taking the first photograph, the camera would continue displaying that image as a transparent overlay on the screen. I could then compose the second photograph while seeing how the two images would interact.
It was a fascinating way to experiment because I could make creative decisions before pressing the shutter for that second exposure.
Unfortunately, the camera applications that were separately available for the A6000 didn't get carried forward as a features that could be added when I got my next newer generation Sony camera. My current main digital camera doesn't have that same dedicated double exposure capability at all.
Fortunately, digital photography gives us another option.
Editing software can recreate the basic effect by layering two photographs on top of one another and adjusting the opacity of the layers. One photograph can be made more prominent while allowing portions of the second photograph to show through.
For photographers who want more control, layer masks open up even more possibilities. Instead of having the same amount of transparency across the entire image, you can selectively determine which portions of each photograph appear and how strongly they appear.
That means you can essentially build the double exposure you want rather than simply accepting whatever the camera happened to produce.
Cell phone photographers aren't left out either.
There are third party camera and editing applications that can create double exposures directly or allow you to combine separately captured photographs. Depending on your phone and the apps you use, you may have surprisingly sophisticated tools available right in your pocket.
If you want to experiment with this digitally, one of the easiest places to start is by searching for instructions specific to your particular camera, phone or editing software. You can even ask an AI tool what options are available for the exact equipment and software you already own.
And of course, there is always the old fashioned way.
Shoot it on film.
There is something particularly satisfying about deliberately creating a double exposure on a completely mechanical camera and then having to wait to discover what you created.
You don't get an instant preview.
You don't get to undo it.
You don't get to look at the back of the camera and decide whether you like it.
You make your best creative decision, press the shutter and then wait.
That uncertainty is part of the fun.
Double exposures are not something you'll likely use all that often. But photography becomes a lot more fun when you occasionally give yourself permission to try something simply because you are curious about what might happen.
You might create something beautiful.
You might create something completely bizarre.
You might create something that doesn't work at all.
And every one of those attempts teaches you something.
That's one of the things I love about photography. There are always more ways to see the world, and sometimes the best way to discover one is to deliberately put two views of the world into the same frame.
If you've ever experimented with double exposure photography, I'd love to see what you created and, even more importantly, hear the story behind it.
Come join the Fairy Tale Photo Academy community on Skool and share your double exposure photographs with us. Tell us how you created them, whether they were captured in camera, created with software or happened accidentally, and what you learned along the way.
The photograph is fun to look at.
But the story of how you created it is often where the real magic lives.


