Make Your Travel Photos Shine With a Starburst
When your travels include theme parks or not, an effective way to add some extra interest to your photos is by shooting into the sun and capturing a sunburst effect with the rays of light coming from the sun.
Depending on the settings on your camera, those individual rays can be quite pronounced or they can be much more subtle. Either way, a sunburst can add that special touch that makes a photo feel very specific to that particular moment. A photo of the same scene at a different time of day might still be interesting, but it may not have quite the same sense of magic.
For the best results, you generally want to photograph the sun while it is relatively low on the horizon. Golden hour around sunrise or sunset can be wonderful for this. You can also try shooting shortly after sunrise or before sunset when there is still enough light to illuminate your subjects rather than leaving them completely in shadow.
This is one area where a traditional camera with an interchangeable lens can really give you some additional control.
For a pronounced starburst, try setting your camera to a low ISO such as 100 to help minimize noise. You can use either manual mode or aperture priority mode. The important setting here is your aperture.
The aperture is the opening inside your lens that controls how much light reaches the camera's sensor. The terminology can be a little counterintuitive when you are first learning photography because a smaller f stop number means a wider opening, while a larger f stop number means a smaller opening.
For creating a strong starburst, try an aperture somewhere around f/16 to f/22. The small opening created by the aperture blades causes the light from the sun to diffract around those blades, producing the rays that create the starburst effect.
Your results can vary depending on the lens you are using. The number of aperture blades in the lens can influence the appearance and number of rays in the starburst. You may find that f/16 gives you a slightly softer effect while f/22 produces a more pronounced starburst.
The smaller aperture also gives you a greater depth of field, which can be helpful when you want both your foreground and background to remain relatively sharp.
One of my favorite ways to make a starburst even more dramatic is to partially hide the sun behind something in your scene.
A building, tree, roller coaster, castle, mountain or even another person can partially obscure the sun. This can create the impression that the sun is sitting right on the edge of your subject, with the rays bursting out from behind it.
That can be particularly effective in theme park photography because you have so many large structures and attractions that can become part of the composition.
And don't worry if you are a cell phone photographer. You can create interesting sunburst effects with a phone too. You just have a little less control over how the camera creates the effect.
Most phone cameras have a fixed aperture, so you cannot simply change the aperture to f/16 or f/22 like you can with many traditional camera lenses. Instead, partially hiding the sun behind a hard edge can help create a similar visual effect.
The edge of a building, a tree branch or another solid object can give the sunlight something to bend around before it reaches the sensor.
Depending on your phone, you may also be able to use a third party camera app that provides more manual control over exposure and other settings. The standard camera app is designed to make photography as simple as possible, which is wonderful for everyday photography, but more advanced photographers may want additional control.
There is another option if you want to create a very obvious star pattern with your phone. You can purchase filters that attach over the phone's camera lens and contain a star pattern. These filters create the effect optically before the light reaches your phone's sensor.
If you go this route, make sure you find one that works with your particular phone or use a clip on version that can be positioned over the camera lens.
The goal isn't necessarily to make the biggest or most dramatic starburst possible. Sometimes a subtle burst of light can be much more effective because it becomes another element of the composition rather than the entire subject of the photograph.
That's something I think is worth remembering whenever we are adding special effects to our photography. The effect should ideally support the photograph rather than become the photograph.
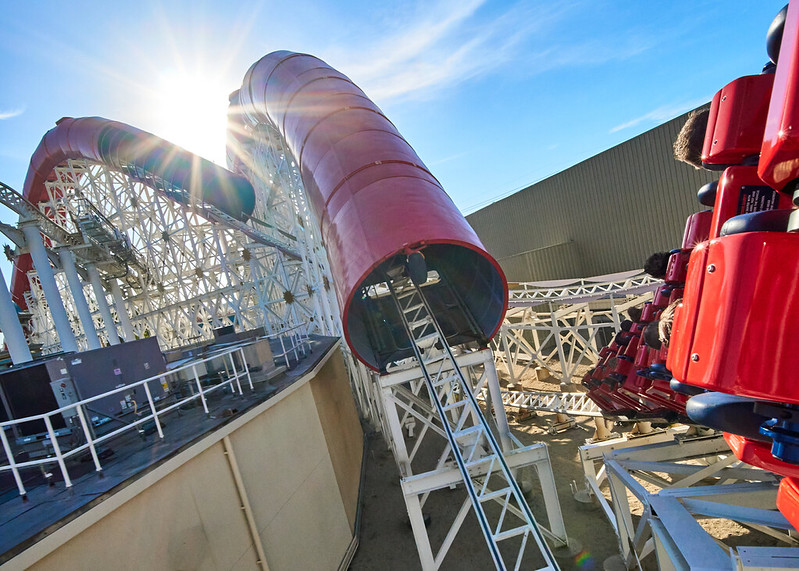
In the case of the photo accompanying this article, the starburst appears above the scream tubes of the Incredicoaster at Disney California Adventure while one of the trains is flying down the track at a steep angle.
This particular photograph was captured within the first hour after Disney California Adventure opened for the day. Sunrise had already occurred before the park opened, but the sun was still low enough on the horizon to capture it alongside the coaster.
I also used a fast shutter speed to make sure the coaster train remained sharp despite traveling at high speed.
There is something particularly fun about this photograph because it might give you the impression that I was standing somewhere near the track photographing the train as it went by.
I wasn't.
The camera was actually on board the train when I took the photograph.
That creates a very different perspective. Instead of photographing the coaster from the ground, I was traveling along with it while capturing a moment that most guests only experience for a fraction of a second as they race through the course.
The photograph gives us the opportunity to stop and visually explore a point on the ride that normally disappears almost as quickly as it arrives.
But it also leaves me with an interesting question.
Is this scene interesting because the sun happened to be in exactly the right place to create that starburst above the coaster?
Or would the photograph still be interesting if the starburst wasn't there?
That's one of the questions I like to ask myself when looking at photographs. Sometimes an element that initially seems like a small detail is actually the thing that transforms an ordinary photograph into something memorable.
Sunbursts are one more tool you can add to your photography toolbox. You don't need to wait for a perfect vacation or a trip to a theme park to practice. Try finding interesting subjects in your own neighborhood when the sun is low and experiment with different angles.
Move yourself around. Partially hide the sun behind different objects. Try different apertures if you have a traditional camera. See what happens when the sun is barely visible compared with having it fully exposed in the frame.
The more you experiment, the more naturally you'll begin to recognize those moments when the light is in just the right place.
And those moments can be fleeting.
That's part of what makes them so much fun to photograph.
If you've captured a sunburst during a theme park visit, vacation, cruise, road trip or even somewhere around your own neighborhood, I'd love to see it.
Come join us inside the Fairy Tale Photo Academy community on Skool and share your photo with the group. It's a great place to show off the photographs you're proud of, ask questions about how you captured them and join the conversation with other photographers who enjoy experimenting with travel and theme park photography.
And if you have a sunburst photo that makes you wonder whether the light completely changed the photograph, bring that one along too. Tell us what you were photographing, what the light was doing and whether you think the photo would have worked without the sunburst.
Let's see what everyone is seeing when they look toward the sun.


